

If you ask us, Google Shopping campaigns are pretty much the best thing since sliced bread. This shopping search engine was actually launched back in 2002 as Froogle, and they rebranded to Google Shopping in 2012. Since then, the search engine has come a long way. Today, Google Shopping ads drive 76.4% of all retail search ad spend, and it generates 85.3% of all retail search clicks.
What is Google Shopping?
Still not 100% sure what Google Shopping is all about? We’ll break it down for you.
In a nutshell, Google Shopping is a dedicated shopping search engine that allows consumers to search for products from online merchants. Search results feature product SKUs, information, prices, stock availability and merchant ratings.
In order to access Google Shopping, consumers typically toggle the “Shopping” tab on Google’s search engine…

That said, Google will usually show Shopping results within regular Google searches, if they believe that these are relevant to the consumer’s search. The results are shown in a standalone section at the top of the results page…

Google Shopping vs other PPC ads
Here’s a question that we get a lot: how are Google Shopping ads advantageous over other PPC ads?
First, let’s talk about Google Shopping vs traditional AdWords ads. If you’re running a standard search or display AdWords campaign, you won’t be able to feature product photos and prices on your ads -- and this makes your ads a lot less compelling.
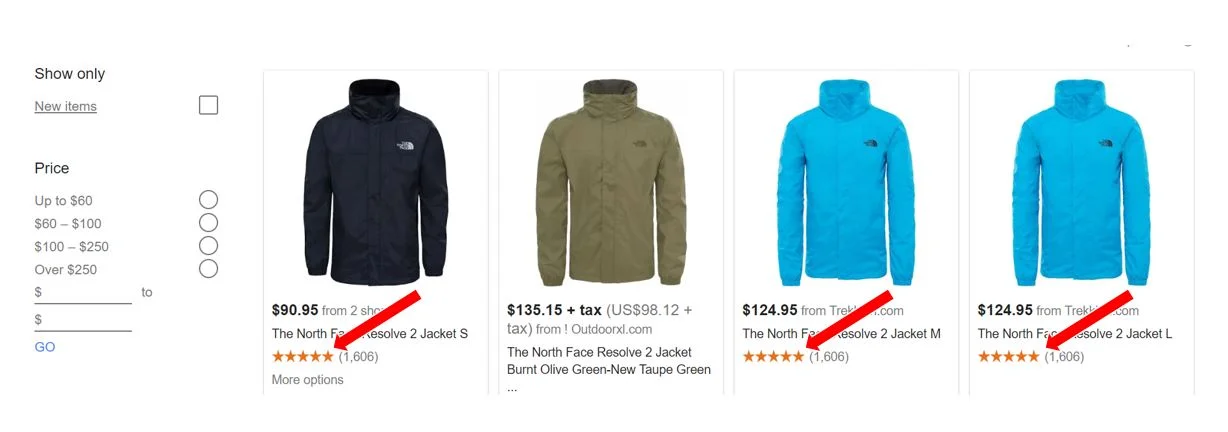
Here’s an example. Say you’re looking to purchase a new raincoat, and you do a quick search on Google. Are you more likely to click on this text listing:

Or one of these Google Shopping ads?
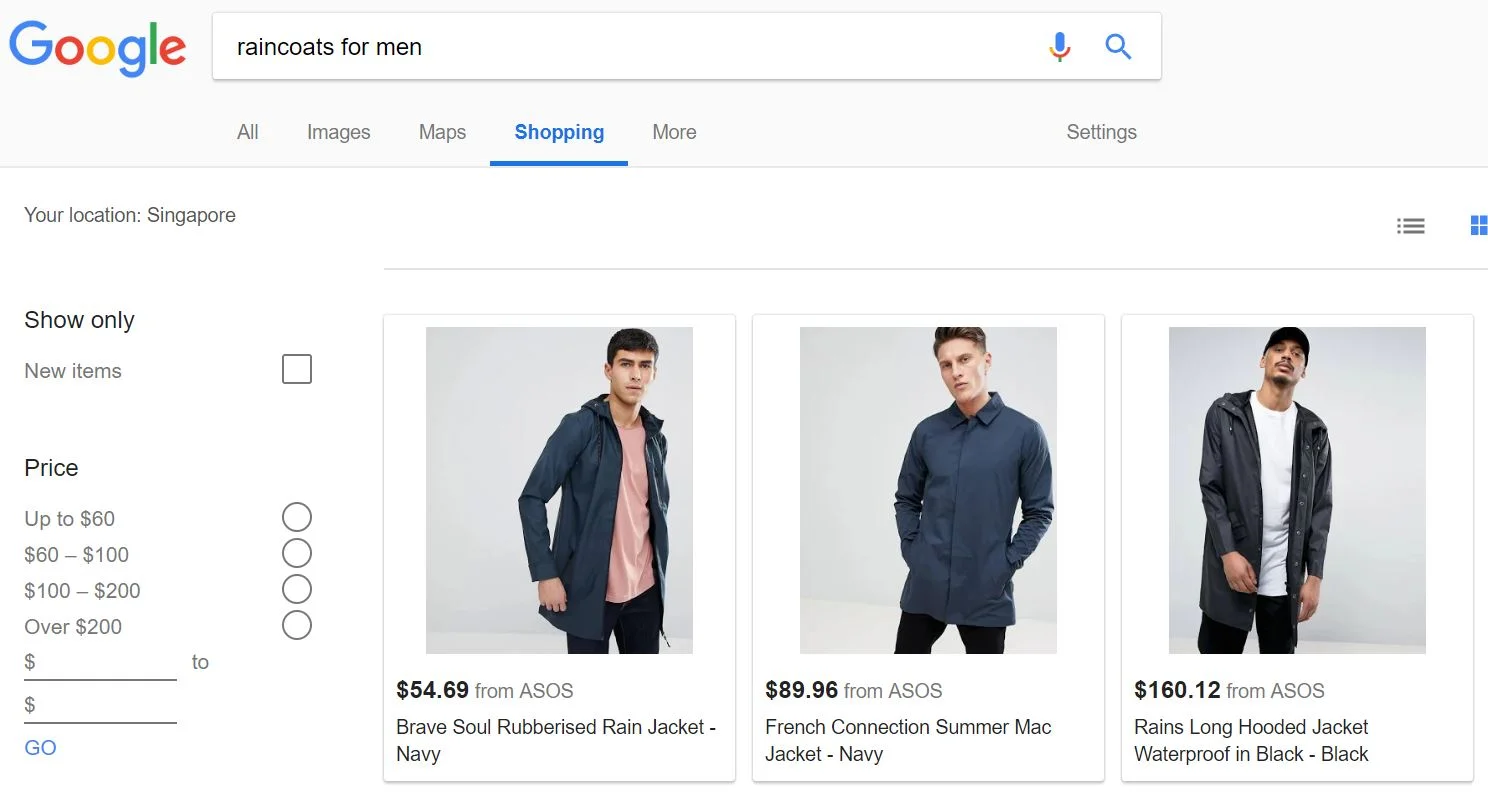
Our point exactly.
Now that we know Google Shopping ads are a lot more compelling than standard AdWords ads, let’s talk about how they fare against Facebook ads.
If you’re running an ad campaign on Facebook, you are able to incorporate pictures and videos into your ads. You can even run a Carousel ad, which allows you to display several pictures that your consumers can swipe through, within a single ad.
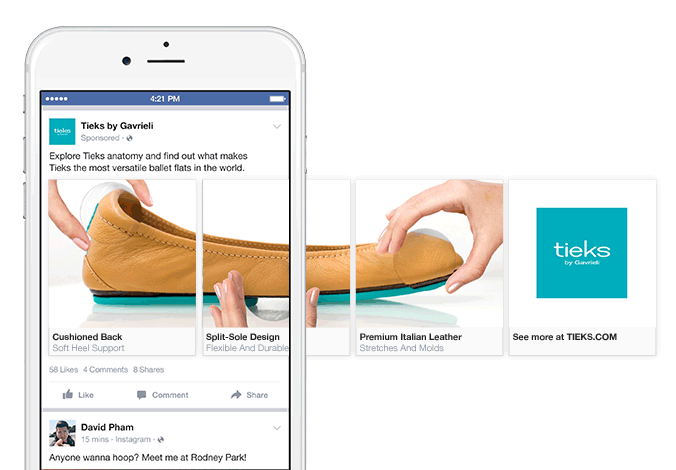
But consider this: Facebook is a drastically different beast as compared to Google. While consumers go on Google to search for products they want to purchase, Facebook users are on Facebook for the purpose of catching up with their friends (and maybe stalking their ex). The purchase intent simply isn’t there.
At the end of the day, when you target searchers on Google, all you need to do is convince them that they should buy your raincoat (and not your competitor’s). When you target Facebook users, on the other hand, you need to convince them that they need a raincoat, before you convince them to buy your raincoat.
Now, don’t get us wrong. We’re not saying that it’s impossible to make a sale on Facebook. You can still run a profitable campaign, assuming that your creatives are eye-catching and relevant, your targeting is on-point, and your pricing is fair. But you do have to jump through more hoops in order to make that sale.
How to set up Google Shopping ads
In this section, we’ll walk you through the basics of how to set up your first Google Shopping campaign. Let’s jump right in!
Step One: Set up your accounts
If you don’t already have an AdWords account, head over to the AdWords platform and set up one now. Next, create an account on the Google Merchant Centre, and navigate to your “Settings” section to link your AdWords account to your Merchant Centre account.
Step Two: Create your feed
Your feed basically consists of product information that’s formatted in a way that Google can understand. What kind of product information are we talking about? Here’s a list of basic product attributes that all merchants will have to input into their feed:
Title - the name of your product
ID - a unique identifier
Description - your product description
Link - the link to your product detail page
Image link - the link to your product image
Availability - whether your product is in stock, out of stock, or on pre-order
Price - the price of your product
Shipping cost - the shipping cost of your product
Tax - the amount of tax levied on your product (for US sellers only)
Do note that you might need to include other information, depending on the nature of your products. For the full list of requirements, check out Google’s Product Data Specification page.
When it comes to data feed creation, you’ve got two options -- you can either build your feed manually, or use a tool to help you do it.

If you’re new to eCommerce, and you only have a handful of products in your catalogue, then go ahead and create your feed manually. Otherwise, we recommend that you use an integration tool (you’ll still have to check through your feed, and supplement any missing information, though).
Before we discuss how to create your feed with an automated tool, let’s take a second to talk about the importance of having a comprehensive, well-organized feed.
First and foremost, you don’t get the luxury of picking your own keywords with Google Shopping ads. Google will simply crawl your feed, and use this to determine whether your products are relevant to consumers’ search queries. Basically, the more accurate and informative your feed is, the higher the chances of your ad appearing in front of searchers.
On top of that, your feed also influences your Quality Score (QS), and your Ad Rank. For the uninitiated, your QS is Google’s measure of the quality of your ads, keywords, and landing pages, and your Ad Rank is the position that your ad appears on the search results page. Generally speaking, the more relevant your feed is to consumers’ search terms, the higher your QS. And with a high QS, you can outrank your competitors even with a lower bid.
TLDR: You can’t choose the keywords that trigger your ads, but ensuring your feed is comprehensive and accurate helps Google show your ads for relevant searches. When your feed is relevant to consumers’ search terms, you can also outrank your competitors with a lower bid.
Automating your feed with integrated tools
Now that you understand the importance of having a kickass feed, let’s talk about how to create your feed using integrated tools.
For folks on Shopify, you can use Shopify’s Google Shopping integration to create a product feed, and upload it to the Google Merchant Centre. Once you link your account, your products, SKUs, product descriptions, and pricing will automatically sync with the Merchant Centre.a

That said, you’ll still have to manually select each product’s key identifiers and categories in order to give Google more context.
For those who are using BigCommerce, they have a nifty Google Shopping by Sales and Orders application that you can use to create your feed.

If you’re on Magento, you don’t get access to any free tools -- but you can pay for a Google Shopping extension that allows you to create a feed and sync your products to the Google Merchant Centre.
Alternatively, there’s also the option of using a third-party tool that isn’t affiliated to any one shopping cart platform. DataFeedWatch, for example, helps pull product data from your site, format it according to Google’s specifications, and upload it to your Google Merchant Centre. You’ll have to pay a recurring fee (their cheapest plan costs $29/month), though, and this will definitely add up over time.
Filling in your product information
Data feed creation best practices basically revolve around making your feed as comprehensive as possible. As mentioned earlier, the more comprehensive and accurate your feed is, the more success you’ll experience with your Google Shopping campaigns. In this section, we walk you through exactly what Google is looking for with each product attribute.
#1: Title
Your product title is one of the first things that catches your consumer’s eye -- so make sure you get it right. Here are some tips to help you out:
Include keywords, but don’t keyword-stuff
Front-load important keywords (having a title that says “Cotton Bedsheets | Machine Washable” probably makes more sense than “Machine Washable Cotton Bedsheets”)
Match the title from your landing page, so shoppers don’t get confused
Don’t include promotional text such as "free shipping" or “50% off”
Incorporate colour, brand, gender, size, quantity and other elements in your title
#2: Description
Your product description helps Google identify what keywords to trigger your ads for. Here are a few best practices to keep in mind:
Include keywords, but don’t keyword-stuff
Match the description from your landing page, so shoppers don’t get confused
Don’t include promotional text such as "free shipping" or “50% off”
Include only information about the product -- don’t link to your store, or talk about relevant products or accessories
Use formatting (line breaks, bullet points, etc) to format your description
Be concise and succinct -- now’s not the time to launch into a long-winded story
#3: Image link
Humans are visual creatures, and using a great-looking image on your listing will incentivise searchers to click. Check out these tips:
Image URL:
Link to the main image of your product (using a HTTP or HTTPS URL)
Use an encoded URL that complies with RFC 2396 or RFC 1738
Allow your URL to be crawled by Google (configure your robots.txt file to allow Googlebot and Googlebot-image to access it)
Image:
Display the product you're selling clearly and accurately -- don’t catfish your consumers
Use either a GIF, JPEG, PNG, BMP or TIFF file
Use an image that’s at least 250 x 250 pixels
Use an image that’s below 64 megapixels, with a file size of under 16MB
Use an image that’s visible in a thumbnail
Use an image that has a white background
Don't include promotional text, watermarks, logos or borders on your images
#4: Price
If you’re selling a homogenous, non-differentiated product, or if your consumers are price-sensitive, then your price will have a large impact on the number of clicks your ad gets. When determining the price of your product, here are a few tips to keep in mind:
Identify your break-even point, so you know how low your prices can go
If you’re targeting lower-income groups or selling necessities, keep your prices low
If you’re targeting higher-income groups or selling luxury items, you can afford to experiment with higher prices. Having higher prices can actually qualify your traffic, and help you attract the right clicks.
If you’re in the US or Canada, don’t include tax in your price
If you’re in a country outside the US or Canada, include value added tax (VAT) or Goods and Services Tax (GST) in your price.
While we’ve discussed four key product attributes above, there are plenty of other attributes whose product information you’ll have to input (product link, availability, shipping cost, product category, product type, and more). We’re not going to lie -- it does take a lot of effort to set up your feed properly. But here’s the good news: you can use Google Merchant Centre’s Feed Rules to streamline the process of setting up your feed.
Using Feed Rules
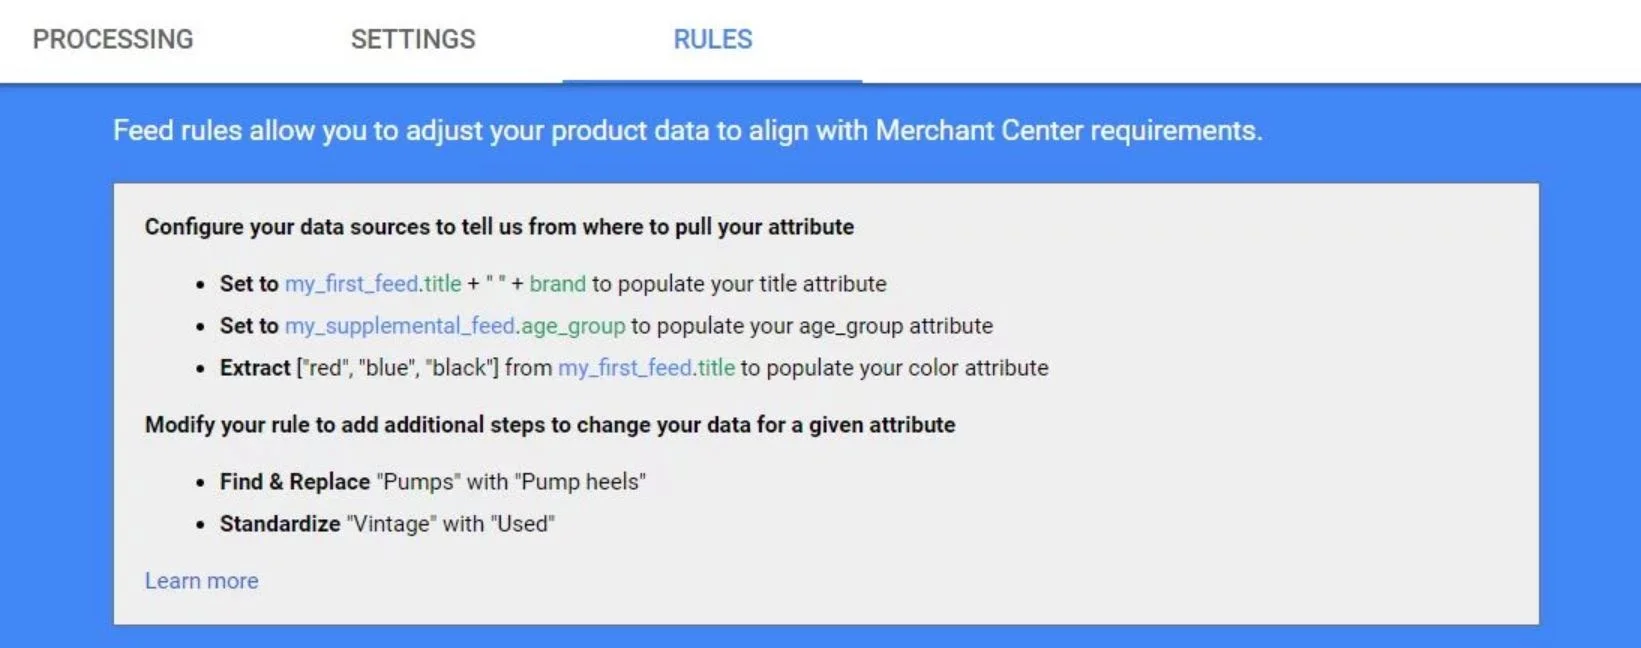
Google bills Feed Rules as a way to “transform your data” to match their product data specification requirements. Once you specify Feed Rules for a specific feed, all your future uploads to that feed will be processed according to these rules. You can use Feed Rules to apply a static value to a group of items, map and assign existing attributes in your feed, and even include attributes from a supplemental feed.
Here’s an example. Say you need to fill in a missing attribute such as “brand” (this is compulsory for all new products except movies, books and musical recording brands), but you don’t want to do this manually. Assuming your store only carries one brand, you can create a rule to set this attribute to a static value; alternatively, you can map it to another attribute in your feed.
To get to your Feed Rules, navigate to the Google Merchant Centre, go to the products menu, and select “Feeds”. From there, click on an active feed, and then select “Rules”.
Once you’re here, you can create a new rule for your feed. Here’s a step-by-step guide:
If you have more than one country of sale associated with your feed, select the country that you want to apply the rule to.
Click “Create Rule”.
Select the relevant attribute.
Configure your Data Sources.
Add Modifications (if any)
Click “Save as draft”
Click “Test changes”, and finally...
Click “Apply” to save and apply the new rule.
Step Three: Set up your Google Shopping campaign
Cool beans -- you’re all set with your feed, and it’s time to set up your first Google Shopping campaign. We won’t go into the specifics of how to do this, but here’s a handy guide by Google which will walk you through the whole process.
What’s the best Google Shopping campaign structure?
Now, once you set up your Google Shopping campaign and create your first ad group, AdWords will automatically create a product group targeting all the products in your store.
Structure-wise, here’s what this looks like:
1 x Campaign, housing all the products
1 x Ad Group, housing all the products
1 x Product Group, housing all the products
A lot of advertisers will just roll with this, but you should actually avoid using this structure at all costs. With this structure, you’re basically using the same bid for all the products on your website, which doesn’t make any sense.
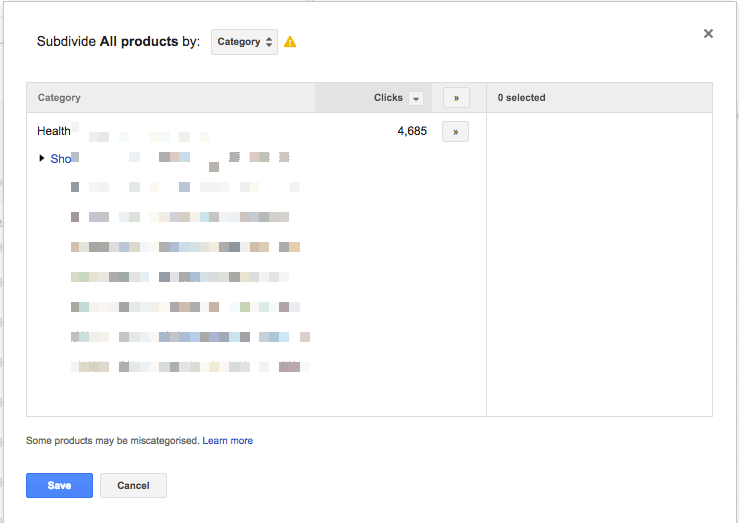
Your products aren’t homogenous - they differ in their popularity, pricing, profitability, conversion rates, and more. Bearing this in mind, you should be bucketing each of your products into individual product groups, and tailoring each product’s bid to the product.
How do you do this? First, head to your AdWords dashboard, and subdivide your product group:

Next, select the Item ID as the option to subdivide by:
Once that’s done, you’ll have a single ad group with all your products in it, with each product being contained in its own product group. Here’s what your campaign structure will look like:
1 x Campaign, housing all the products
1 x Ad Group, housing all the products
Many x Product Groups, housing 1 product each
Some advertisers will be content to stop here, but we recommend going a level deeper, and organising your campaign using Single Product Ad Groups (SPAG). With SPAG, you’re splitting your campaign even further, and putting just one product in each ad group. This gives you the ability to “funnel” your search terms to specific ads using negative keywords, which in turn helps you to increase profitability.
Here’s what a SPAG structure looks like:
1 x Campaign, housing all the products
Many x Ad Groups, housing 1 product each
Many x Product Groups, housing 1 product each
Say you have two products that are a good fit for the search query “men’s raincoats”. Product A gives you a lower profit margin, and it’s a less profitable product. Product B, on the other hand, is a best-selling item with high margins and conversion rates. If someone searches for the query “men’s raincoats”, you’d obviously want to show them Product B, not Product A.
Assuming you’ve got your campaign set up with a SPAG structure, what you can do is create a negative keyword in Product A’s ad group for “men’s raincoats”. Since Google can no longer send traffic to Product A, they’ll funnel all the traffic for this keyword to Product B. This translates to higher conversions, increased revenue, and more money in the bank!
Now, you might be wondering: can’t you just change your bids so that Google knows to send more traffic to one product over the other? Yes, that’s possible as well -- but Google will take some time to process the change in your bids, and it might not send 100% of your traffic to a single product. Using negative keywords is a much better option.
How do you split up your products into a SPAG structure? Don’t worry, you don’t need to do this manually -- there are plenty of tools such as PPCsamurai.com or Optmyzr.com that will help you take care of it.
Branded vs non-branded traffic
Aside from using individual ad groups and product groups for each product, you should also be splitting your campaigns up to tackle branded vs non-branded traffic.
With branded traffic, you’re dealing with consumers who already know your brand, and these folks are much more likely to make a purchase. Non-branded traffic, on the other hand, tends to consist of more new visitors (although you might get some returning visitors as well), so you’ll probably experience lower conversion rates with them.
Now, here’s the question… how can you set up your campaigns to achieve a clear distinction between branded and non-branded traffic?
First, add all your brand terms as negative keywords for your non-branded campaign. This ensures that someone who searches a branded keyword will see only the ads from your branded campaigns. On top of that, set higher priority levels for your non-branded campaigns as opposed to your branded campaigns. This ensures that someone who searches for a non-branded keyword will see your non-branded ads (which have a higher priority level).
Here’s a step-by-step guide to help you out:
Duplicate your existing campaign.
Rename both campaigns - one as “Brand”, one as “Non-brand”.
Set the “Brand” campaign to medium priority level.
Set the “Non-brand” campaign to high priority level.
Add brand keywords as negative keywords to the “Non-brand” campaign. (Include plurals and misspellings).
Now that you’ve divvied up your traffic properly, and you can channel your traffic into brand vs non-brand campaigns, it’s time to decide on your bids for each campaigns. Generally speaking, advertisers tend to bid aggressively for brand campaigns, and conservatively for non-brand campaigns. The idea is to devote more of your budget to reaching out to the folks who have a higher chance of converting (that is, those who are searching for branded terms).

That said, your bidding strategy also depends on other factors. If your eCommerce store is based in the US, and you’ve just entered a new market, for example, then you’ll probably have minimal or zero branded searches. Because you’re acquiring customers from scratch, it’ll make more sense to pause your branded campaigns, and allocate more budget to your non-branded campaigns.
Step Four: Optimise your feed
Now that you’ve gotten your Google Shopping campaign up and running, it’s time to optimise your feed. Don’t worry -- you don’t need to run yourself ragged A/B testing every single attribute on your feed. Just hone in on your low-hanging fruit, aka the attributes that have the most impact on your click through rates and conversions.
A case study by Searchengineland shows that the single most important attribute that you can optimise is your product title. In this case study, it was found that improving the relevance of your product title leads to a nearly 10x improvement in product traffic.

We’ve covered the basics of how to write a good title in Step Two of this guide, so you’ve already got that going for you. Now, let’s talk about how to optimise your title using the real-life data you have. We call this “semantic query optimisation”.
Semantic query optimisation might sound like a fancy term, but it’s actually quite a simple concept. Here’s how it works: you look at your search query reports, and identify the words and phrases (other than your brand name!) that bring about the most sales for your product. Then you edit your product title to incorporate those words… and you’re done!
This strategy helps you fine-tune your product title and make it more relevant to what your consumers are actually searching for. Say you’ve got an ad for a raincoat, and it’s currently listed as “Columbia Waterproof Raincoat For Men”. After looking at your search query reports, you might realise that the search term “Mens PVC Coated Raincoat” is generating the bulk of your sales -- so go ahead and rewrite your title to “Columbia PVC Coated Waterproof Raincoat”. Pretty simple, huh?
Step Five: Optimise your bids
Your bids are integral to your Google Shopping campaigns -- they determine what search queries your ads show up for, and they play a huge role in influencing the profitability of your campaign.

When trying to decide how high your bid should be, the first thing you’ll want to do is calculate your maximum bid. This takes into consideration your price, Cost Of Goods Sold (COGS), and your average conversion rate.
Let’s assume the following:
Price = $100
COGS = $30
Conversion rate = 2%
To calculate your maximum bid, subtract your COGS from your price to find out your profit, then multiply this by your conversion rate.
$100 - $30 = $70
$70 x 2% = $1.40
Great, so you now know that your maximum bid is $1.40. We recommend starting with a lower bid and then inching your way up slowly, so go ahead and multiply this by 0.5. Remember, you can always increase your bid if you aren’t seeing any results, but if you start with a bid that’s too high, you might have wasted a great deal of ad spend acquiring visitors that you could’ve gotten for less.
$1.40 x 0.5 = $0.70
This gives you an initial bid of $0.70.
Now, let’s run through some common questions that we get about bidding...
Q: If I’ve never run any ad campaigns before, how do I figure out my conversion rate?
A: You can take the conversion rate on your website or eCommerce store as a reference, but do discount this by at least 20%. (More if you want to be conservative!) You get both direct traffic and referrals to your website, and these typically convert at a higher rate than paid traffic does.
Q: What should I do if I don’t get any impressions or clicks?
A: Increase your bids slowly, until you do get impressions and clicks. We recommend increases of $0.03 to $0.10 at a time.
Q: My campaign isn’t hitting its daily budget. What’s going on?
Don’t stress -- it’s common for Google Shopping campaigns to not hit their budgets in their early days. When you’re first starting out, Google will show your ads more conservatively, because they’re looking to see how searchers respond to them. Once you’ve established a good click through rate (CTR), and Google knows that your ads are relevant to searchers, they’ll start showing your ads more frequently.
Q: Is bidding low always preferable to bidding high?
Nope. Some business owners might be bidding for branding and awareness, and not for short-term sales. Under such circumstances, it makes sense to bid more so that you get more impressions and clicks, instead of optimising your bid to bring you the most conversions with the least ad spend. Once you’ve gotten your product in front of as many eyeballs as possible, you can always follow up with a remarketing campaign to bring in more sales.
On top of that, you might also realise that some of your keywords bring you cheap but low-quality traffic. In this situation, you’d want to spend more and focus on your expensive keywords that bring you higher-quality visitors who do covert as paying customers.
Q: How often should you update your bids?
As much as you need to, initially! You can update your bids every few days, but take note that you might see less activity on the weekends, when everyone’s out and about. As such, if you’ve made any bids right before the weekend or during the weekend, give your campaign sufficient time to “breathe” before you go back in and tweak your bids.
Once your campaigns are stable and profitable, you can probably get away with monitoring your bids and adjusting them on a weekly basis.
Step Six: Check out the Google Merchant Centre programmes
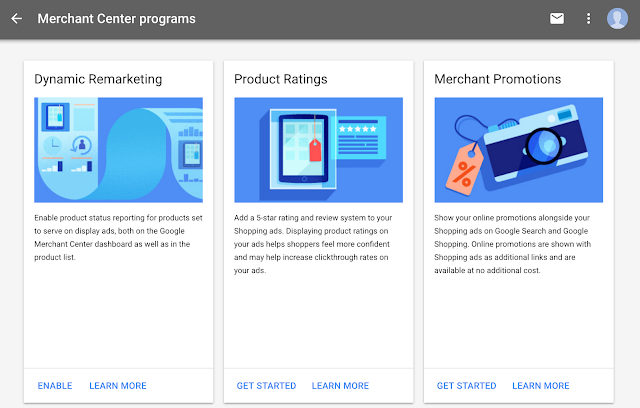
The Google Merchant Centre is where you’ll go to manage your feeds, view your data, and explore the various programmes that you’re eligible for.

Google Merchant Centre Programmes include Dynamic Remarketing, Product Ratings, and Merchant Promotions. Think of these programmes as add-ons or extras that you can use to boost the effectiveness of your Google Shopping campaigns...
Dynamic Remarketing
Dynamic Remarketing allows you to target consumers who have previously visited your site, and hit them up with remarketing ads that are likely to interest them.

Here’s the thing: a whopping 92% of consumers who visit your website for the first time won’t convert as a paying user. But seeing as these folks are at least somewhat interested in your products or services, it’s such a waste to let them churn into oblivion. That’s where remarketing ads come in!
Here’s how it works: when visitors browse your website but leave without converting, you can use Dynamic Remarketing to serve them remarketing ads on the Google Display Network. As you might imagine, remarketing ads are a lot more effective than standard displays ads. More specifically, the average click through rate for remarketing ads is 0.7% (as compared to display ads’ 0.07%).
Apart from remarketing to site visitors who haven’t converted, you can also remarket to site visitors who have made a purchase -- simply upsell them or cross-sell them instead. As Google puts it, shoppers who are already favourably disposed toward your products might be “easily influenced” to purchase an additional product they were initially considering.
To learn more, visit Google’s Dynamic Remarketing Guide.
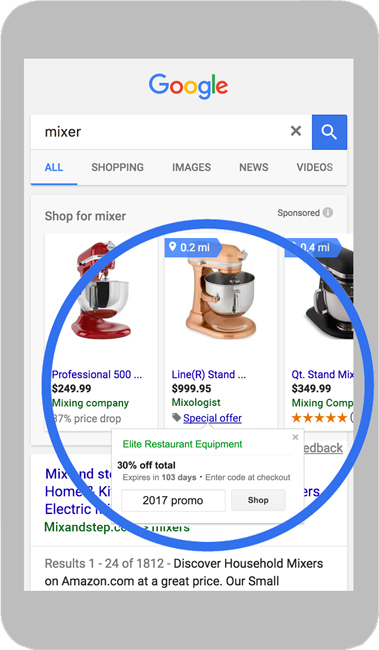
Product Ratings
Product Ratings are pretty straightforward; these allow you to show star ratings on your Google Shopping ads.
As you can see in the screenshot, searchers will be able to view your product rating plus a count of the total reviews. Google states that these star ratings represent “aggregated rating and review data” for the product, and that they’re compiled from multiple sources, including merchants, third-party reviews aggregators, editorial sites and consumers.
If you’re thinking of using Google’s Product Ratings feature, do note that there’s a caveat: according to Google, these ratings will only be shown when their system determines that the rating information is “accurate and relevant” for shoppers’ needs. As of now, we don’t know exactly what will result in Google pulling the plug on your product ratings, but to err on the side of caution, make sure your reviews are updated (not old!), and don’t buy any fake reviews.
To learn more, visit Google’s Product Ratings guide.
Google Merchant Promotions
Last but not least, we have Google Merchant Promotions, which is a feature that allows advertisers to distribute online promotions with their Google Shopping ads. Again, this is pretty straightforward -- when you add promotions to your Google Shopping products, searchers will see a “Special Offer” link that gives them more information about your offer.
To get started with Google Merchant Promotions, create a promotion from your feed, and submit it for review. Google deems the following promotions “acceptable”:
Discounts: % off, cash back, buy one get one free, or buy one and get the second one at a discounted rate
Free gifts: Free item or free gift card of a specified value
Shipping: Free or discounted shipping
If you’re interested to read a real-life case study of how it works, hop on over and check out the 2-week test that Wordstream conducted using Merchant Promotions. While the Wordstream team originally thought the Merchant Promotions would just help boost performance in their Google Shopping campaign, it actually increased their overall account performance. We’re talking a 36% increase in conversions, a 25% decrease in Cost Per Action, and a 16% and 13% increase in revenue and Return On Ad Spend respectively. Not too shabby, huh?
To learn more, visit Google’s Merchant Promotions Guide.
A final word on running Google Shopping ads
I’m not going to lie -- if you’re new to the world of Google Shopping ads, it can be a bit daunting. But there are plenty of tools out there that you can use to make your life easier.
Here’s a quick recap…
To get your feed up and running, use Shopify’s Google Shopping integration, BigCommerce’s Google Shopping by Sales and Orders application, Magento’s Google Shopping extension, DataFeedWatch, and Google’s Feed Rules
To organise your campaigns into the SPAG structure, use PPCsamurai.com and Optmyzr.com.
Have any further questions? Feel free to give us a holler in the comments below, and we’ll get back to you. Otherwise, it’s time to set up your very first Google Shopping campaign!