
Before you can run a single Google Shopping ad or Performance Max campaign for your ecommerce store, there's one thing that has to exist first: Your Google Merchant Center account.
It's Merchant Center that feeds all your ecommerce products into Google. Without it, you literally cannot run any Shopping ads at all.
So here's the whole setup, start to finish, the way my team and I do it. I've been doing Google Ads for eighteen years and running my own agency for thirteen of those, so I'll flag the little things that trip people up as we go. I'm using a Shopify store as the example throughout, because that's what most of you reading this are running.
Signing Up Takes About Four Minutes
Head to Merchant Center (just Google "Merchant Center"), click "Let's begin", sign in with your Google account and clear two-step verification if it asks.
Google then asks a short set of questions. Do you sell products online? Yes. Your store's website URL. Do you have a physical store? For most people reading this the answer is no, but obviously say yes if that applies.
You may see a prompt offering to connect Merchant Center to Shopify. Skip it and click continue to Merchant Center, because we'll do that connection properly later.
Next comes a notification about free Shopping listings, and that one is worth understanding rather than clicking past.
Free Listings Are Real, But Manage Your Expectations
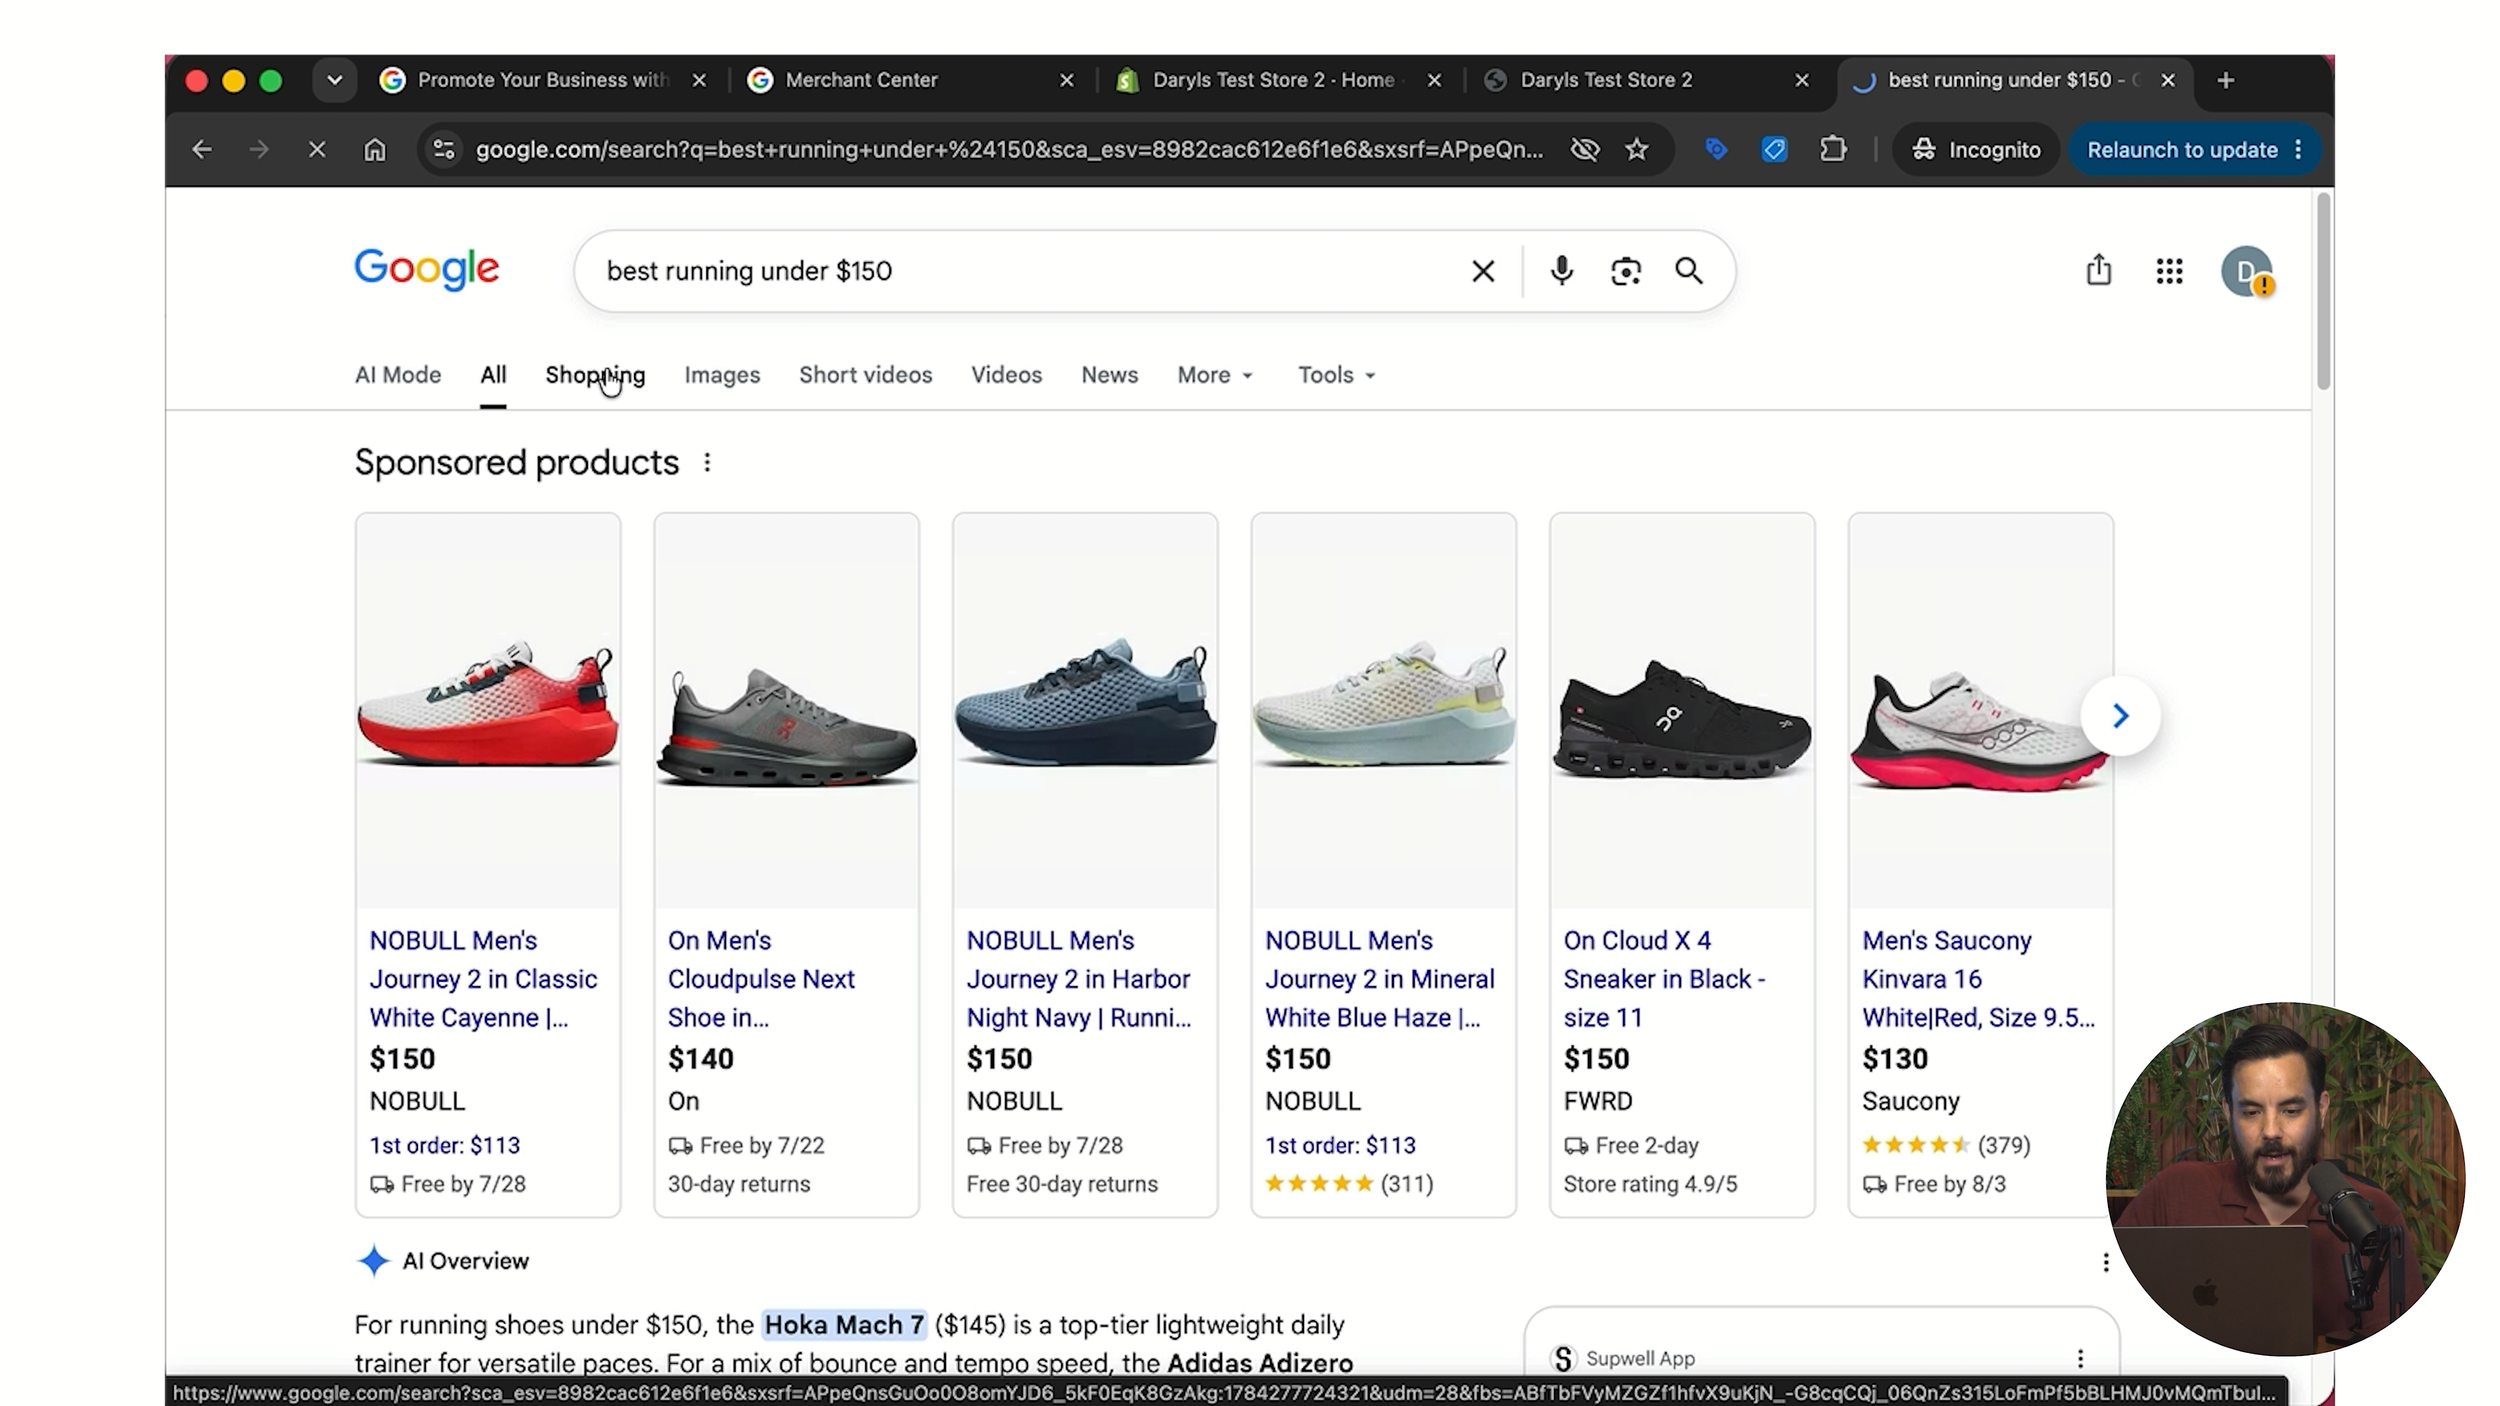
Once your account is live with a product feed in it, your products become eligible for free listings on Google Shopping. No cost, no bidding, genuine clicks and genuine sales.
The catch is volume. Free listings pull roughly 5 to 10% of the traffic you'd see from Shopping ads or Performance Max. They sit on the Shopping tab below the row of paid placements, and most users never scroll past that top row. That's exactly why free Shopping doesn't drive a ton of traffic. Nice to have, but don't build a strategy on it.
Enter your business name, and deselect the marketing email boxes unless you actively want updates from Google. Click continue, and your initial sign-up is done.
Six Tasks, and One You Should Start Early
You'll now land on a dashboard with six tasks and a progress bar tracking you.
If you're on Shopify, do this first: install the official Google and YouTube app in your Shopify store. There's a button in Merchant Center that sends you there, and it opens in the same window, so spin up a fresh tab and keep your setup flow alive in the other one.
Inside Shopify, click install, confirm access, install again. Then select the app in your left-hand sidebar and click "connect Google account". Sign in, and at the permissions screen select all of them.
You'll then see a step asking you to connect your Merchant Center account. Leave that alone for now. I deliberately hold off there, because connecting too early hides options later in the process that I want you to see.
My genuine tip: install the Google and YouTube app a full day before you sit down to do the rest of the setup. Product syncing takes time, and having your products already flowing makes the back half of this walkthrough far smoother.
Website Verification Is Where People Stall
Back in Merchant Center, fill in your business address, then you hit verification. Google wants proof you own the domain you entered.
The default option sends a code to an email address on that domain. If that doesn't suit, click "more ways to verify" for better routes.
If you already have Google Tag Manager or Google Analytics on your site, and admin access to one of those logins, use that. It's by far the fastest path.
If you have neither, you'll be adding an HTML tag or file to your site. Before doing it the generic way, click "use your ecommerce platform" for platform-specific instructions.
For Shopify, the path is Online Store, the three dots, Edit code, then Layout and theme.liquid. Copy the verification code from Google's instructions page and paste it at the end of your head section, just above the closing /head tag, then save.
Head back to Merchant Center, hit verify, and select the countries where you want your products to show.
The Real Decision: How Your Products Flow In
Google asks how you want your product data registered into Merchant Center. There's a newer AI option for adding products, currently in beta. It's been buggy every time I've used it, so I don't recommend it yet. That leaves three sensible choices: connect directly to Shopify, use Google Sheets, or use a third-party feed management tool via the API.
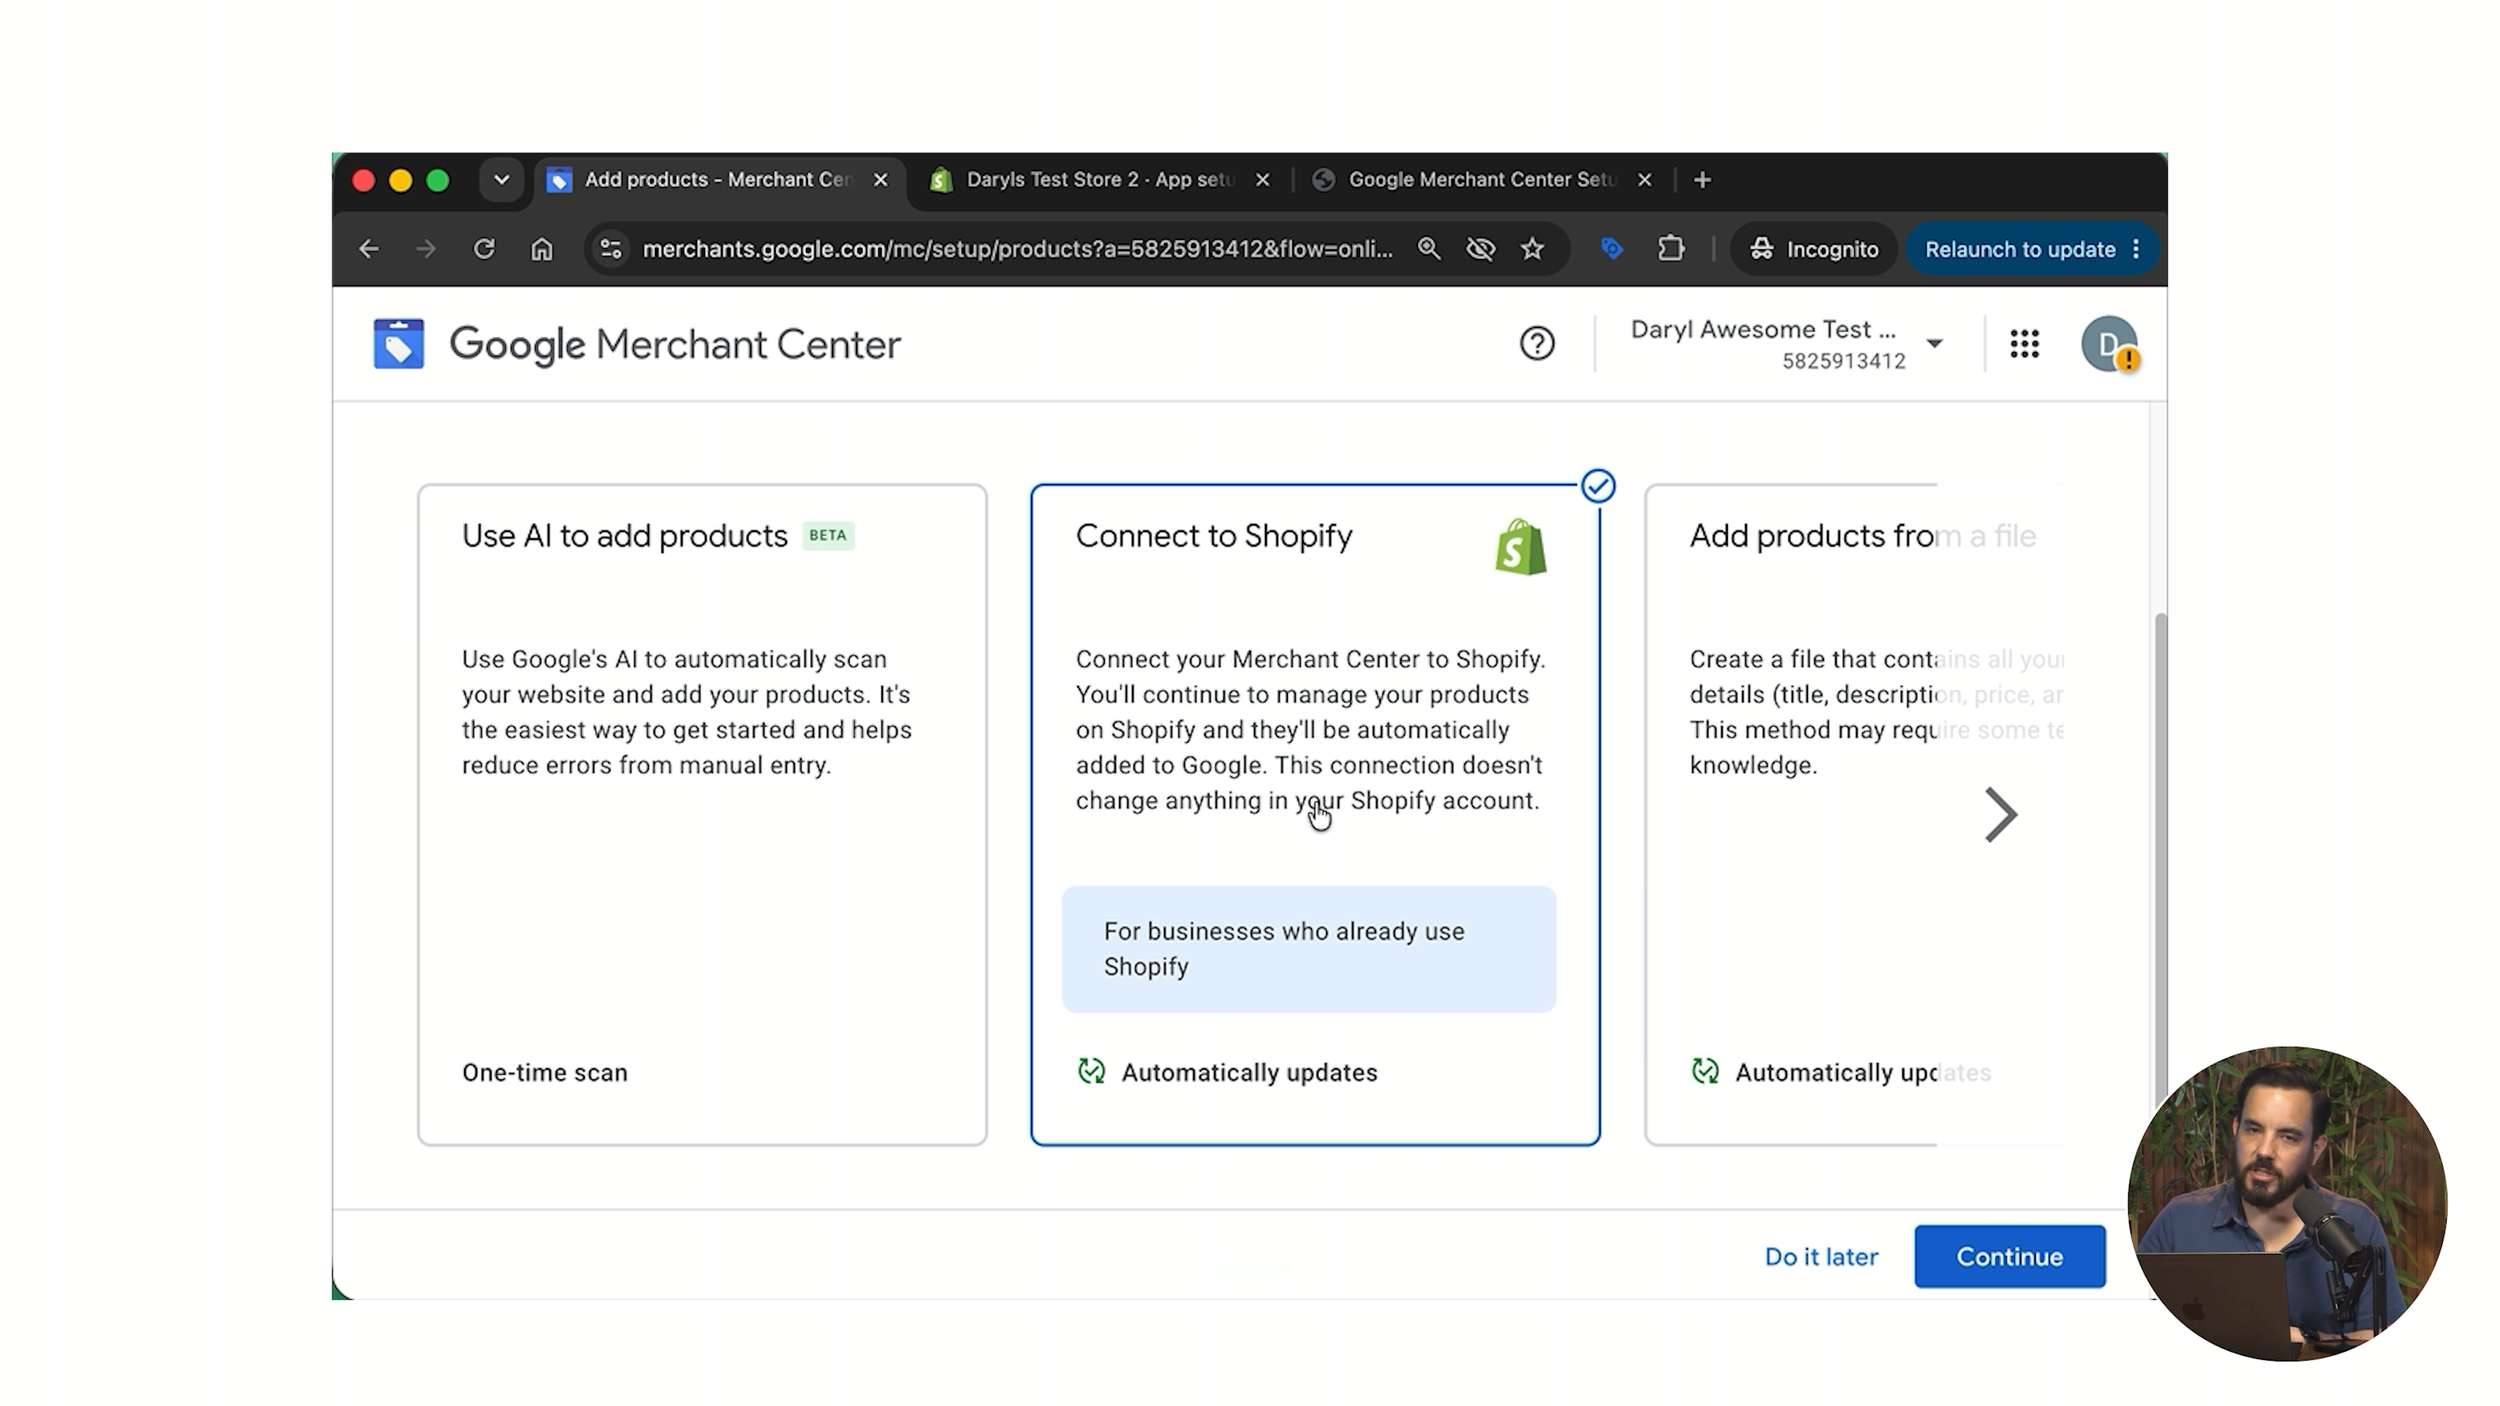
My way of deciding is two quick questions. Do you have a lot of products? More than 50, or into the hundreds, thousands or even tens of thousands. Are you spending a lot? Above $5,000 per month in ad spend.
If either answer is yes, move to a third-party feed tool. They typically cost around $50 a month or less for most advertisers, unless you're sitting on tens of thousands of products, and they're worth it for the optimisation features you cannot access any other way. My team and I use feedoptimise.com for our clients. It's cost-effective and powerful for batch-optimising large numbers of products in one go.
Connect to Shopify
The easiest option by a mile. The app is installed, you pick this option, and everything auto-pipes across. The disadvantage is flexibility. If you've followed me for a while, you know how much I bang on about optimising your product title, product type, image and description to make them keyword rich. With the direct Shopify connection you have very limited ability to do any of that.
Google Sheets
Considerably more power. You can customise your title specifically for Shopping ads, plus your image, description, product type and conversational attributes. Every field in the feed becomes editable. The trade-off is a more manual setup.
For the walkthrough I ran the demo on Connect to Shopify, because if you just want to be live today with minimum hassle, that's the right call.
Choosing it sends you back to the Google and YouTube app to finish the connection you paused earlier. The system checks your store requirements, confirming things like your privacy policy and refund policy are live. If they're missing, you'll be asked to sort them. Agree to the terms and complete the setup.
Your connection will show zero products at first. That's completely normal. Give it time and the total and approved numbers will climb.
Shipping and Returns: Do Not Let Google Guess
Next up is shipping. Google offers a shortcut where you type your policy in plain language, click "generate policy", and let Google interpret it.
Don't do that. This is the one place in the whole setup where I'd push back hardest on the easy route. Enter your shipping details manually and in full, because your shipping information has a real influence on the placement your products earn in Shopping ads. If you offer free shipping over a certain order value, enter that accurately.
Returns work the same way. Countries and policy, condition and window, method and fees. Fill each section in properly, review the confirmation screen, tick the box confirming the details are correct, and save.
Your progress bar may now read five of six. That's almost always products still syncing, and once they land the final task closes itself.
The Last Step Everyone Forgets
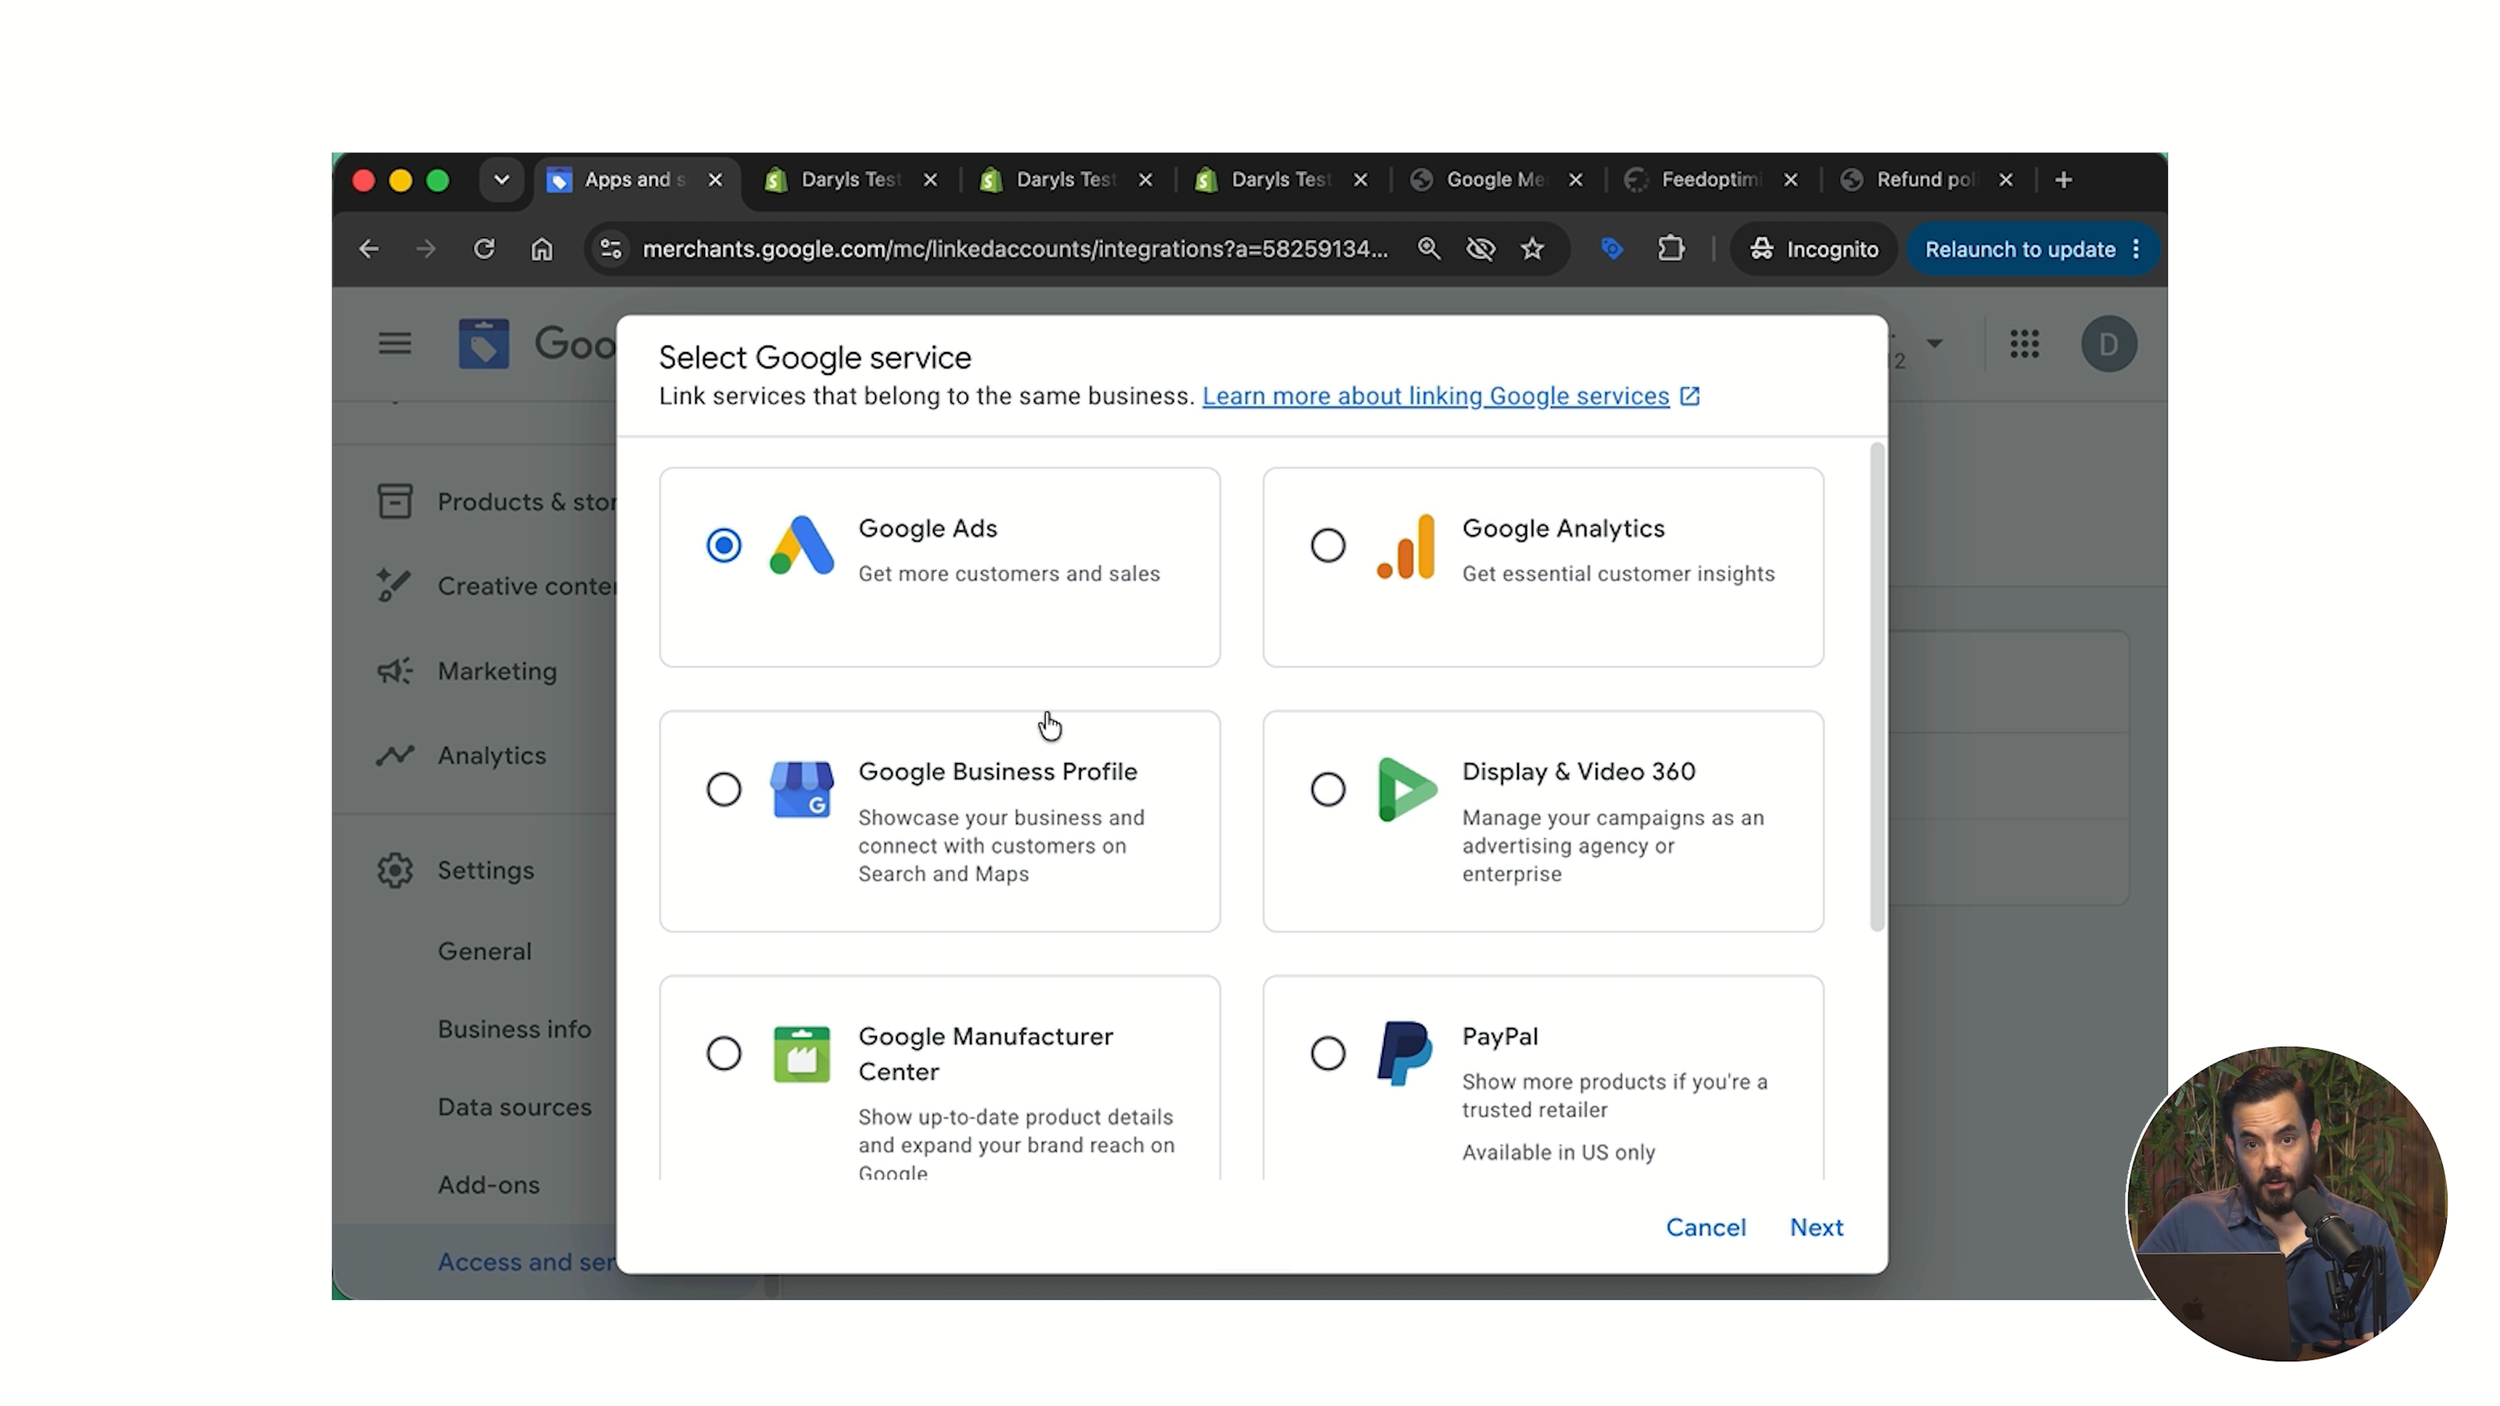
Your Merchant Center is set up, but it isn't connected to anything yet. The entire point of this exercise is running Shopping ads and Performance Max, and that needs Merchant Center linked to Google Ads. This is the step people forget.
Open your settings panel, go to "Access and services", tab over to "Apps and services" and click "Ad service". Google Ads is usually the first option. Click next, then select the correct account if you have access to several.
Google will also ask whether you want to link the business manager account associated with that login. You can link Merchant Center only, or link both. I link both.
That's the final step. Once it's done, head into Google Ads and start building campaigns.
On your overview screen, expect an empty performance card and an empty "your business on Google" card. If you also see a set of suggestion cards telling you what to do next, every required step is complete. If you're still seeing setup prompts instead, something is outstanding, and it's usually products still syncing.
One last thing. Now your feed exists, the fastest way to put it to work is a Performance Max campaign, and I have a completely free ecommerce Performance Max course that walks you through building one with the exact feed you just set up. The link is in the description below the video.
Go and make it happen. Your product feed is the foundation everything else sits on.
Conclusion
Google Merchant Center is the non-negotiable first step for any ecommerce store that wants to advertise products on Google. The sign-up itself is quick, but a handful of decisions inside the setup will shape how much control you have over your feed for years afterwards.
The main points to take away:
Merchant Center is mandatory for Shopping ads, Performance Max and free Shopping listings. Nothing runs without it.
Free Shopping listings are genuine but low volume, pulling roughly 5 to 10% of the traffic that paid Shopping or Performance Max delivers.
On Shopify, install the Google and YouTube app early, ideally a day before you do the rest of the setup, so your products have time to sync.
Verify your domain through Google Tag Manager or Google Analytics if you have admin access to either. Otherwise, use the platform-specific instructions and paste the HTML tag into theme.liquid at the end of your head section.
Skip the AI product-adding option for now. It's in beta and it's been buggy.
Choose your feed method deliberately. Connect to Shopify is the easiest but the least flexible. Google Sheets unlocks full field-level customisation for a bit more manual work. A third-party feed tool is the right answer once you pass roughly 50 products or $5,000 a month in ad spend.
Enter shipping and returns details manually rather than using Google's generated policy shortcut. Shipping data influences your placement in Shopping ads.
Link Merchant Center to Google Ads via Settings, Access and Services, Apps and Services, Ad service. Without this link, none of the rest matters.